Running A Full Node
Support the Bitcoin network by running your own full node
What Is A Full Node?
A full node is a program that fully validates transactions and blocks. Almost all full nodes also help the network by accepting transactions and blocks from other full nodes, validating those transactions and blocks, and then relaying them to further full nodes.
Most full nodes also serve lightweight clients by allowing them to transmit their transactions to the network and by notifying them when a transaction affects their wallet. If not enough nodes perform this function, clients won’t be able to connect through the peer-to-peer network—they’ll have to use centralized services instead.
Many people and organizations volunteer to run full nodes using spare computing and bandwidth resources—but more volunteers are needed to allow Bitcoin to continue to grow. This document describes how you can help and what helping will cost you.
Costs And Warnings
Running a Bitcoin full node comes with certain costs and can expose you to certain risks. This section will explain those costs and risks so you can decide whether you’re able to help the network.
Special Cases
Miners, businesses, and privacy-conscious users rely on particular behavior from the full nodes they use, so they will often run their own full nodes and take special safety precautions. This document does not cover those precautions—it only describes running a full node to help support the Bitcoin network in general.
Please consult an expert if you need help setting up your full node correctly to handle high-value and privacy-sensitive tasks.
Secure Your Wallet
It’s possible and safe to run a full node to support the network and use its wallet to store your bitcoins, but you must take the same precautions you would when using any Bitcoin wallet. Please see the securing your wallet page for more information.
Minimum Requirements
Bitcoin Core full nodes have certain requirements. If you try running a node on weak hardware, it may work—but you’ll likely spend more time dealing with issues. If you can meet the following requirements, you’ll have an easy-to-use node.
-
Desktop or laptop hardware running recent versions of Windows, Mac OS X, or Linux.
-
50 gigabytes of free disk space
-
2 gigabytes of memory (RAM)
-
A broadband Internet connection with upload speeds of at least 400 kilobits (50 kilobytes) per second
-
An unmetered connection, a connection with high upload limits, or a connection you regularly monitor to ensure it doesn’t exceed its upload limits. It’s common for full nodes on high-speed connections to use 200 gigabytes upload or more a month. Download usage is around 20 gigabytes a month, plus around an additional 40 gigabytes the first time you start your node.
-
6 hours a day that your full node can be left running. (You can do other things with your computer while running a full node.) More hours would be better, and best of all would be if you can run your node continuously.
Note: many operating systems today (Windows, Mac, and Linux) enter a low-power mode after the screensaver activates, slowing or halting network traffic. This is often the default setting on laptops and on all Mac OS X laptops and desktops. Check your screensaver settings and disable automatic “sleep” or “suspend” options to ensure you support the network whenever your computer is running.
Possible Problems
-
Legal: Bitcoin use is prohibited or restricted in some areas.
-
Bandwidth limits: Some Internet plans will charge an additional amount for any excess upload bandwidth used that isn’t included in the plan. Worse, some providers may terminate your connection without warning because of overuse. We advise that you check whether your Internet connection is subjected to such limitations and monitor your bandwidth use so that you can stop Bitcoin Core before you reach your upload limit.
-
Anti-virus: Several people have placed parts of known computer viruses in the Bitcoin block chain. This block chain data can’t infect your computer, but some anti-virus programs quarantine the data anyway, making it more difficult to run a full node. This problem mostly affects computers running Windows.
-
Attack target: People who want to disrupt the Bitcoin network may attack full nodes in ways that will affect other things you do with your computer, such as an attack that limits your available download bandwidth or an attack that prevents you from using your full node’s wallet for sending transactions.
Linux Instructions
The following instructions describe installing Bitcoin Core on Linux systems.
Ubuntu 14.10
Instructions for Bitcoin Core 0.10.0.
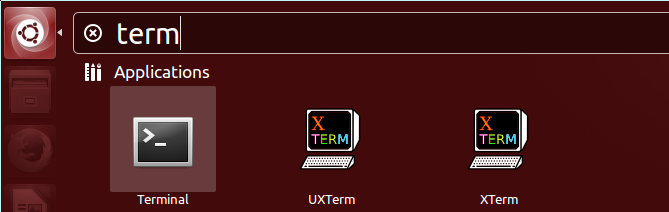
If you use Ubuntu Desktop, click the Ubuntu swirl icon to start the Dash and type “term” into the input box. Choose any one of the terminals listed:
Alternatively, access a console or terminal emulator using another method, such as SSH on Ubuntu Server or a terminal launcher in an alternative desktop environment.
Type the following line to add the Bitcoin Personal Package Archive (PPA) to your system:
sudo apt-add-repository ppa:bitcoin/bitcoin
You will be prompted for your user password. Provide it to continue. Afterwards, the following text will be displayed:
 Stable Channel of bitcoin-qt and bitcoind for Ubuntu, and their dependencies
 More info: https://launchpad.net/~bitcoin/+archive/ubuntu/bitcoin
Press [ENTER] to continue or ctrl-c to cancel adding it
Press enter to continue. The following text (with some variations) will be displayed and you will be returned to the command line prompt:
gpg: keyring `/tmp/tmpixuqu73x/secring.gpg' created
gpg: keyring `/tmp/tmpixuqu73x/pubring.gpg' created
gpg: requesting key 8842CE5E from hkp server keyserver.ubuntu.com
gpg: /tmp/tmpixuqu73x/trustdb.gpg: trustdb created
gpg: key 8842CE5E: public key "Launchpad PPA for Bitcoin" imported
gpg: no ultimately trusted keys found
gpg: Total number processed: 1
gpg:               imported: 1  (RSA: 1)
OK
Type the following line to get the most recent list of packages:
sudo apt-get update
A large number of lines will be displayed as different update files are downloaded. This step may take several minutes on a slow Internet connection.
To continue, choose one of the following options
-
To install the Bitcoin Core Graphical User Interface (GUI), type the following line and proceed to the Bitcoin Core GUI section below:
sudo apt-get install bitcoin-qt -
To install the Bitcoin Core daemon (bitcoind), which is useful for programmers and advanced users, type the following line and proceed to the Bitcoin Core Daemon section below:
sudo apt-get install bitcoind -
To install both the GUI and the daemon, type the following line and read both the GUI instructions and the daemon instructions. Note that you can’t run both the GUI and the daemon at the same time using the same configuration directory.
sudo apt-get install bitcoin-qt bitcoind
After choosing what packages to install, you will be asked whether you want to proceed. Press enter to continue.
Bitcoin Core GUI
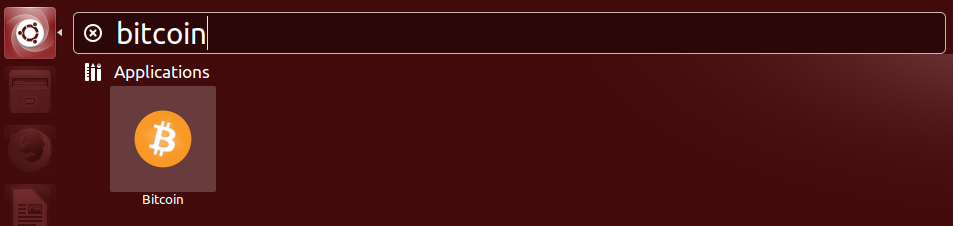
To start Bitcoin Core GUI, click the Ubuntu swirl icon to open the Dash,
type bitcoin, and click the Bitcoin icon.
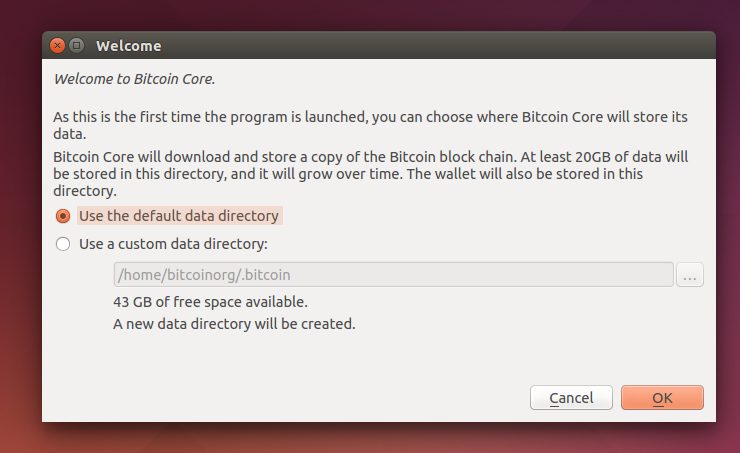
You will be prompted to choose a directory to store the Bitcoin block chain and your wallet. Unless you have a separate partition or drive you want to use, click Ok to use the default.
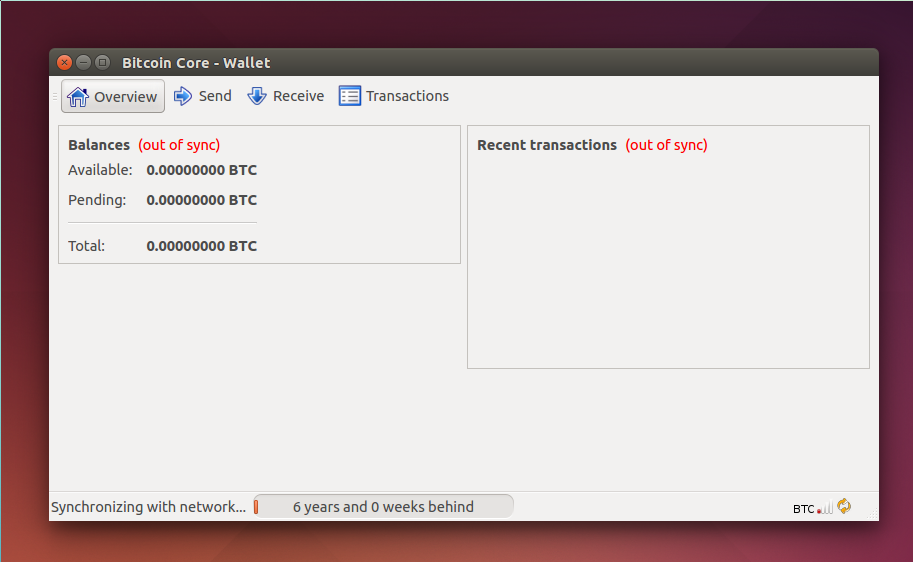
Bitcoin Core GUI will begin to download the block chain. This step will take at least several hours, and it may take a day or more on a slow Internet connection or with a slow computer. During the download, Bitcoin Core will use a significant part of your connection bandwidth. You can stop Bitcoin Core at any time by closing it; it will resume from the point where it stopped the next time you start it.
After download is complete, you may use Bitcoin Core as your wallet or you can just let it run to help support the Bitcoin network.
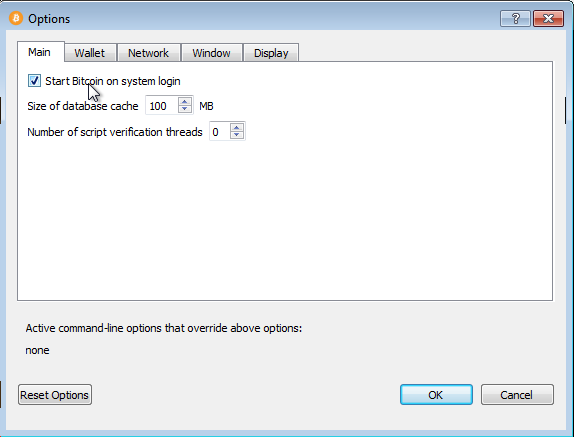
Optional: Start Your Node At Login
Starting your node automatically each time you login to your computer makes it easy for you to contribute to the network. The easiest way to do this is to tell Bitcoin Core GUI to start at login.
While running Bitcoin Core GUI, open the Settings menu and choose Options. On the Main tab, click Start Bitcoin on system login. Click the Ok button to save the new settings.
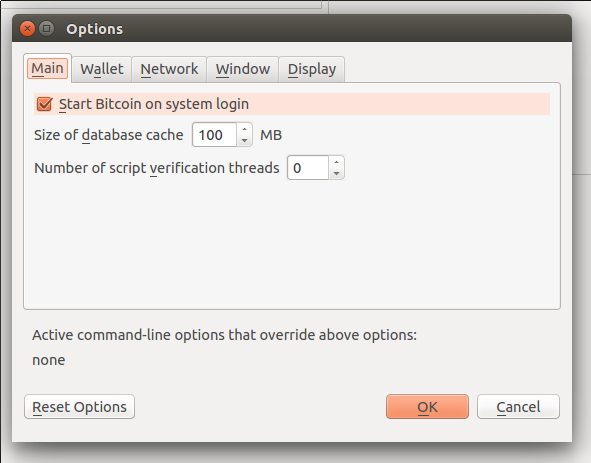
The next time you login to your desktop, Bitcoin Core GUI will be automatically started in as an icon in the tray.
![]()
You have now completed installing Bitcoin Core. If you have any questions, please ask in one of Bitcoin’s many communities, such as Bitcoin Forum, Bitcoin StackExchange or the #bitcoin IRC chatroom on Freenode.
To support the Bitcoin network, you also need to allow incoming connections. Please read the Network Configuration section for details.
Bitcoin Core Daemon
If you’re logged in as an administrative user with sudo access, you may log out. The steps in this section should be performed as the user you want to run Bitcoin Core. (If you’re an expert administrator, you can make this a locked account used only by Bitcoin Core.)
Before using the Bitcoin Core daemon, bitcoind, you need to create its
configuration file with a user name and password. First create the
.bitcoin directory, create (touch) the file, and set the file’s
permissions so that only your user account can read it. From the
terminal, type:
mkdir ~/.bitcoin
touch ~/.bitcoin/bitcoin.conf
chmod 600 ~/.bitcoin/bitcoin.conf
Then you can run the command bitcoind. It will print output similar
to this:
bitcoind
Error: To use the "-server" option, you must set a rpcpassword in the configuration file:
/home/bitcoinorg/.bitcoin/bitcoin.conf
It is recommended you use the following random password:
rpcuser=bitcoinrpc
rpcpassword=XXXXXXXXXXXXXXXXXXXXXXXXXXXXXXXXXXXXXXXXXXXX
(you do not need to remember this password)
The username and password MUST NOT be the same.
If the file does not exist, create it with owner-readable-only file permissions.
It is also recommended to set alertnotify so you are notified of problems;
for example: alertnotify=echo %s | mail -s "Bitcoin Alert" admin@foo.com
The “rpcpassword” displayed will be unique for your system. You can copy the rpcuser and rpcpassword lines into your configuration file using the following commands. Note that in most Ubuntu terminals, you need to press Ctrl-Shift-C to copy and Ctrl-Shift-V to paste because Ctrl-C and Ctrl-V have different meanings in a Unix-style terminal.
echo rpcuser=bitcoinrpc >> ~/.bitcoin/bitcoin.conf
echo rpcpassword=XXXXXX >> ~/.bitcoin/bitcoin.conf
(Warning: Don’t use XXXXXX as your RPC password. Copy the rpcpassword displayed by bitcoind for your system.)
Now you can start Bitcoin Core daemon for real. Type the following command:
bitcoind -daemon
It will print a message that Bitcoin Core is starting. To interact with
Bitcoin Core daemon, you will use the command bitcoin-cli (Bitcoin
command line interface).
Note: it may take up to several minutes for Bitcoin Core to start,
during which it will display the following message whenever you use
bitcoin-cli:
error: {"code":-28,"message":"Verifying blocks..."}
After it starts, you may find the following commands useful for basic
interaction with your node:
getblockchaininfo,
getnetworkinfo,
getnettotals,
getwalletinfo,
stop, and help.
For example, to safely stop your node, run the following command:
bitcoin-cli stop
A complete list of commands is available in the developer reference.
When Bitcoin Core daemon first starts, it will begin to download the
block chain. This step will take at least several hours, and it may
take a day or more on a slow Internet connection or with a slow
computer. During the download, Bitcoin Core will use a significant part
of your connection bandwidth. You can stop Bitcoin Core at any time using
the stop command; it will resume from the point where it stopped the next
time you start it.
Optional: Start Your Node At Boot
Starting your node automatically each time your computer boots makes it easy for you to contribute to the network. The easiest way to do this is to start Bitcoin Core daemon from your crontab. To edit your crontab, run the following command:
crontab -e
Scroll to the bottom of the file displayed and add the following line:
@reboot bitcoind -daemon
Save the file and exit; the updated crontab file will be installed for you. Now Bitcoin Core daemon will be automatically started each time your reboot your computer.
If you’re an Ubuntu expert and want to use an init script instead, see this Upstart script.
You have now completed installing Bitcoin Core. If you have any questions, please ask in one of Bitcoin’s many communities, such as Bitcoin Forum, Bitcoin StackExchange or the #bitcoin IRC chatroom on Freenode.
To support the Bitcoin network, you also need to allow incoming connections. Please read the Network Configuration section for details.
Other Linux Distributions
Instructions for Bitcoin Core 0.10.0.
The following instructions describe installing Bitcoin Core using tools
available in most mainstream Linux distributions. We assume you use a
Bourne-like shell such as bash.
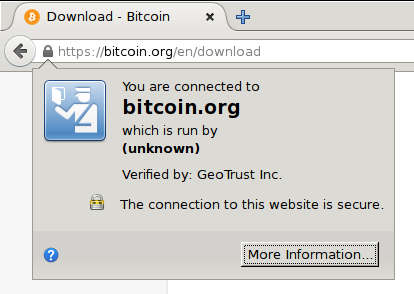
Using any computer, go to the Bitcoin Core download page and verify you have made a secure connection to the server.
In the “Linux (tgz)” section of the Download page, choose the appropriate file for your Linux install (either 32-bit or 64-bit) and download the file. If necessary, move the file to the computer you want to use to run Bitcoin Core.
Optional: Verify the release signatures
If you know how to use PGP, you should also click the Verify Release Signatures link on the download page to download a signed list of SHA256 file hashes. The file is currently signed by Wladimir J. van der Laan’s key. His primary key’s fingerprint is:
71A3 B167 3540 5025 D447 E8F2 7481 0B01 2346 C9A6
Many previous releases were signed by Gavin Andresen’s key. His primary key’s fingerprint is:
2664 6D99 CBAE C9B8 1982 EF60 29D9 EE6B 1FC7 30C1
You should verify these keys belong to their owners using the web of trust or other trustworthy means. Then use PGP to verify the signature on the release signatures file. Finally, use PGP or another utility to compute the SHA256 hash of the archive you downloaded, and ensure the computed hash matches the hash listed in the verified release signatures file.
If you aren’t already logged into the computer you want to install
Bitcoin on, login now. Make sure you use an account that can use su
or sudo to install software into directories owned by the root user.
If you logged in graphically, start a terminal. If you logged in another way, we will assume you’re already in a shell.
Locate the file you downloaded and extract it using the tar command
followed by the argument xzf followed by the file name. The argument
xzf means eXtract the gZipped tar archive File. For example, for a
64-bit tar archive in your current directory, the command is:
tar xzf bitcoin-0.10.0-linux64.tar.gz
This will create the directory bitcoin-0.10.0 within your current
working directory. We will install the contents of its bin
subdirectory into the /usr/local/bin directory using the the install
command. The install command is part of the GNU coreutils available on
nearly every Linux distribution, and the /usr/local/bin directory is a
standard location for self-installed executables (you may edit the
commands below to use a different location).
If you use sudo to run commands as root, use the following command
line:
sudo install -m 0755 -o root -g root -t /usr/local/bin bitcoin-0.10.0/bin/*
If you use su to run commands as root, use the following command line:
su -c 'install -m 0755 -o root -g root -t /usr/local/bin bitcoin-0.10.0/bin/*'
To continue, choose one of the following options
-
To use Bitcoin Core Graphical User Interface (GUI), proceed to the Bitcoin Core GUI section below.
-
To use the Bitcoin Core daemon (bitcoind), which is useful for programmers and advanced users, proceed to the Bitcoin Core Daemon section below.
-
To use both the GUI and the daemon, read both the GUI instructions and the daemon instructions. Note that you can’t run both the GUI and the daemon at the same time using the same configuration directory.
Bitcoin Core GUI
In order to use Bitcoin Core GUI, you will need several libraries
installed. All of them should be available in all major
recently-released Linux distributions, but they may not be installed on
your computer yet. To determine whether you’re missing any libraries,
open a terminal (if you haven’t already) and run the command
/usr/local/bin/bitcoin-qt to start Bitcoin Core GUI.
If all the required libraries are installed, Bitcoin Core will start. If a required library is missing, an error message similar to the following message will be displayed:
/usr/local/bin/bitcoin-qt: error while loading shared libraries: libQtGui.so.4: cannot open shared object file: No such file or directory
Search your distribution’s package database for the missing file
missing and install package containing that file. Then re-run
/usr/local/bin/bitcoin-qt to see if it’s missing another file.
Repeat until Bitcoin Core GUI starts.
You will be prompted to choose a directory to store the Bitcoin block chain and your wallet. Unless you have a separate partition or drive you want to use, click Ok to use the default.
Bitcoin Core GUI will begin to download the block chain. This step will take at least several hours, and it may take a day or more on a slow Internet connection or with a slow computer. During the download, Bitcoin Core will use a significant part of your connection bandwidth. You can stop Bitcoin Core at any time by closing it; it will resume from the point where it stopped the next time you start it.
After download is complete, you may use Bitcoin Core as your wallet or you can just let it run to help support the Bitcoin network.
Optional: Start Your Node At Login
Starting your node automatically each time you login to your computer makes it easy for you to contribute to the network. The easiest way to do this is to tell Bitcoin Core GUI to start at login. This only works in desktop environments that support the autostart specification, such as Gnome, KDE, and Unity.
While running Bitcoin Core GUI, open the Settings menu and choose Options. On the Main tab, click Start Bitcoin on system login. Click the Ok button to save the new settings.
The next time you login to your desktop, Bitcoin Core GUI should be automatically started in as an icon in the tray.
![]()
If Bitcoin Core GUI does not automatically start, you may need to add it
to an .xinit or .xsession file as described
here.
You have now completed installing Bitcoin Core. If you have any questions, please ask in one of Bitcoin’s many communities, such as Bitcoin Forum, Bitcoin StackExchange or the #bitcoin IRC chatroom on Freenode.
To support the Bitcoin network, you also need to allow incoming connections. Please read the Network Configuration section for details.
Bitcoin Core Daemon
If you’re logged in as an administrative user with sudo access, you may log out. The steps in this section should be performed as the user you want to run Bitcoin Core. (This can be a locked account used only by Bitcoin Core.) If you changed users in a graphical interface, start a terminal.
Before using the Bitcoin Core daemon, bitcoind, you need to create its
configuration file with a user name and password. First create the
.bitcoin directory, create (touch) the file, and set the file’s
permissions so that only your user account can read it. From your
terminal or console, type:
mkdir ~/.bitcoin
touch ~/.bitcoin/bitcoin.conf
chmod 600 ~/.bitcoin/bitcoin.conf
Then you can run the command bitcoind. It will print output similar
to this:
bitcoind
Error: To use the "-server" option, you must set a rpcpassword in the configuration file:
/home/bitcoinorg/.bitcoin/bitcoin.conf
It is recommended you use the following random password:
rpcuser=bitcoinrpc
rpcpassword=XXXXXXXXXXXXXXXXXXXXXXXXXXXXXXXXXXXXXXXXXXXX
(you do not need to remember this password)
The username and password MUST NOT be the same.
If the file does not exist, create it with owner-readable-only file permissions.
It is also recommended to set alertnotify so you are notified of problems;
for example: alertnotify=echo %s | mail -s "Bitcoin Alert" admin@foo.com
The “rpcpassword” displayed will be unique for your system. You can copy the rpcuser and rpcpassword lines into your configuration file using the following commands. Note that in many Linux terminals, you need to press Ctrl-Shift-C to copy and Ctrl-Shift-V to paste because Ctrl-C and Ctrl-V have different meanings in a Unix-style terminal.
echo rpcuser=bitcoinrpc >> ~/.bitcoin/bitcoin.conf
echo rpcpassword=XXXXXX >> ~/.bitcoin/bitcoin.conf
(Warning: Don’t use XXXXXX as your RPC password. Copy the rpcpassword displayed by bitcoind for your system.)
Now you can start Bitcoin Core daemon for real. Type the following command:
bitcoind -daemon
It will print a message that Bitcoin Core is starting. To interact with
Bitcoin Core daemon, you will use the command bitcoin-cli (Bitcoin
command line interface).
Note: it may take up to several minutes for Bitcoin Core to start,
during which it will display the following message whenever you use
bitcoin-cli:
error: {"code":-28,"message":"Verifying blocks..."}
After it starts, you may find the following commands useful for basic
interaction with your node:
getblockchaininfo,
getnetworkinfo,
getnettotals,
getwalletinfo,
stop, and help.
For example, to safely stop your node, run the following command:
bitcoin-cli stop
A complete list of commands is available in the developer reference.
When Bitcoin Core daemon first starts, it will begin to download the
block chain. This step will take at least several hours, and it may
take a day or more on a slow Internet connection or with a slow
computer. During the download, Bitcoin Core will use a significant part
of your connection bandwidth. You can stop Bitcoin Core at any time using
the stop command; it will resume from the point where it stopped the next
time you start it.
Optional: Start Your Node At Boot
Starting your node automatically each time your computer boots makes it easy for you to contribute to the network. The easiest way to do this is to start Bitcoin Core daemon from your crontab. To edit your crontab on most distributions, run the following command:
crontab -e
Scroll to the bottom of the file displayed and add the following line:
@reboot bitcoind -daemon
Save the file and exit; the updated crontab file will be installed for you. On most distributions, this will cause Bitcoin Core daemon to be automatically started each time your reboot your computer.
If you’re a expert system administrator and want to use an init script instead, see the init scripts directory in Bitcoin Core’s source tree.
You have now completed installing Bitcoin Core. If you have any questions, please ask in one of Bitcoin’s many communities, such as Bitcoin Forum, Bitcoin StackExchange or the #bitcoin IRC chatroom on Freenode.
To support the Bitcoin network, you also need to allow incoming connections. Please read the Network Configuration section for details.
Windows Instructions
Windows 8.x
Instructions for Bitcoin Core 0.10.0 on Windows 8 and 8.1.
Go to the Bitcoin Core download page and verify you have made a secure connection to the server.
Click the large blue Download Bitcoin Core button to download the Bitcoin Core installer to your desktop.
Optional: Verify the release signatures
If you know how to use PGP, you should also click the Verify Release Signatures link on the download page to download a signed list of SHA256 file hashes. The file is currently signed by Wladimir J. van der Laan’s key. His primary key’s fingerprint is:
71A3 B167 3540 5025 D447 E8F2 7481 0B01 2346 C9A6
Many previous releases were signed by Gavin Andresen’s key. His primary key’s fingerprint is:
2664 6D99 CBAE C9B8 1982 EF60 29D9 EE6B 1FC7 30C1
You should verify these keys belong to their owners using the web of trust or other trustworthy means. Then use PGP to verify the signature on the release signatures file. Finally, use PGP or another utility to compute the SHA256 hash of the archive you downloaded, and ensure the computed hash matches the hash listed in the verified release signatures file.
After downloading the file to your desktop or your Downloads folder
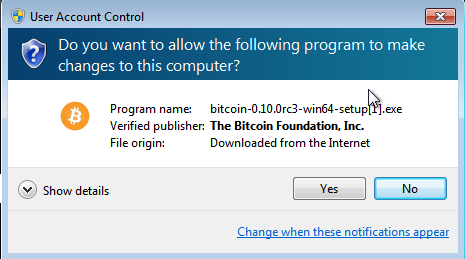
(C:\Users\<YOUR USER NAME>\Downloads), run it by double-clicking
its icon. Windows will ask you to confirm that you want to run it:
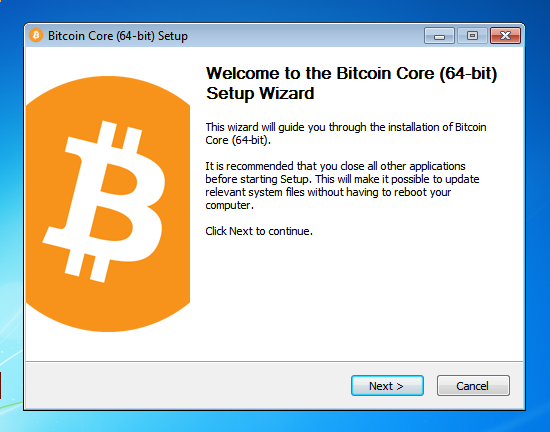
The Bitcoin installer will start. It’s a typical Windows installer, and it will guide you through the decisions you need to make about where to install Bitcoin Core.
To continue, choose one of the following options
-
If you want to use the Bitcoin Core Graphical User Interface (GUI), proceed to the Bitcoin Core GUI section below.
-
If you want to use the Bitcoin Core daemon (bitcoind), which is useful for programmers and advanced users, proceed to the Bitcoin Core Daemon section below.
-
To want to use both the GUI and the daemon, read both the GUI instructions and the daemon instructions. Note that you can’t run both the GUI and the daemon at the same time using the same configuration directory.
Bitcoin Core GUI
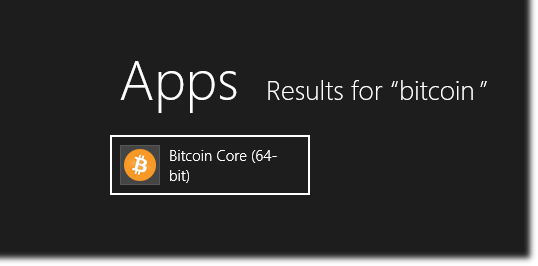
Press the Windows key (⊞ Win) and start typing “bitcoin”. When the
Bitcoin Core icon appears (as shown below), click on it.
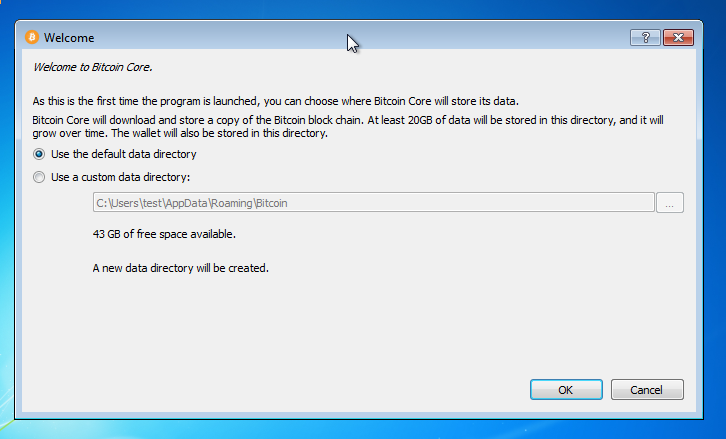
You will be prompted to choose a directory to store the Bitcoin block chain and your wallet. Unless you have a separate partition or drive you want to use, click Ok to use the default.
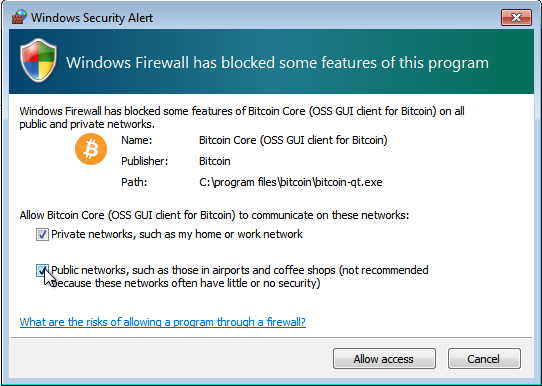
Your firewall may block Bitcoin Core from making outbound connections. It’s safe to allow Bitcoin Core to use all networks. (Note: you will still need to configure inbound connections as described later in the Network Configuration section.)
Bitcoin Core GUI will begin to download the block chain. This step will take at least several hours, and it may take a day or more on a slow Internet connection or with a slow computer. During the download, Bitcoin Core will use a significant part of your connection bandwidth. You can stop Bitcoin Core at any time by closing it; it will resume from the point where it stopped the next time you start it.
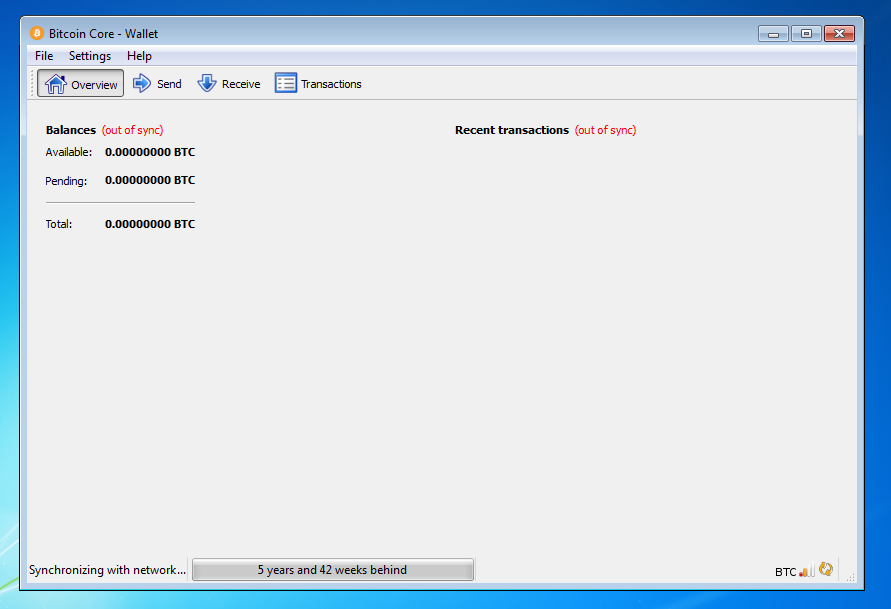
After download is complete, you may use Bitcoin Core as your wallet or you can just let it run to help support the Bitcoin network.
Optional: Start Your Node At Login
Starting your node automatically each time you login to your computer makes it easy for you to contribute to the network. The easiest way to do this is to tell Bitcoin Core GUI to start at login.
While running Bitcoin Core GUI, open the Settings menu and choose Options. On the Main tab, click Start Bitcoin on system login. Click the Ok button to save the new settings.
The next time you login to your desktop, Bitcoin Core GUI will be automatically started minimized in the task bar.
Warning: to prevent data corruption, do not force shutdown your computer from the Windows shutdown screen when you have Bitcoin Core running.
You have now completed installing Bitcoin Core. If you have any questions, please ask in one of Bitcoin’s many communities, such as Bitcoin Forum, Bitcoin StackExchange or the #bitcoin IRC chatroom on Freenode.
To support the Bitcoin network, you also need to allow incoming connections. Please read the Network Configuration section for details.
Bitcoin Core Daemon
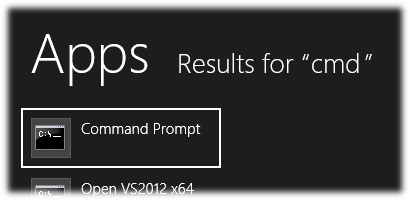
To start Bitcoin Core daemon, first open a command window: press the
Windows key (⊞ Win) and type “cmd”. Choose the option labeled
“Command Prompt”.
If you installed Bitcoin Core into the default directory, type the following at the command prompt:
C:\Program Files\Bitcoin\daemon\bitcoind -daemon
It will display an error message similar to the one below:
Error: To use the bitcoind or the "-server" option to bitcoin-qt,
you must set a rpcpassword in the configuration file:
C:\Users\Example\AppData\Roaming\Bitcoin\bitcoin.conf
It is recommended you use the following random password:
rpcuser=bitcoinrpc
rpcpassword=XXXXXXXXXXXXXXXXXXXXXXXXXXXXXXXXXXXXXXXXXXXX
(you do not need to remember this password)
The username and password MUST NOT be the same.
If the file does not exist, create it with owner-readable-only file permissions.

It is also recommended to set alertnotify so you are notified of problems;
for example: alertnotify=echo %s | mail -s "Bitcoin Alert" admin@foo.com
Pay attention to these particular lines:
C:\Users\<YOUR USER NAME>\AppData\Roaming\Bitcoin\bitcoin.conf
[...]
rpcuser=bitcoinrpc
rpcpassword=XXXXXXXXXXXXXXXXXXXXXXXXXXXXXXXXXXXXXXXXXXXX
The first line will actually have your username. The later two lines will include a randomly-generated password that you will need to copy and paste. (Do not use XXXXXXX.)
Leave the command prompt window open and start File Explorer.
In File Explorer, open the directory indicated in the message
(C:\Users\<YOUR USER NAME>\AppData\Roaming\Bitcoin), right-click on
the File Explorer window and choose New → Text file. Name the file
bitcoin.conf and then right-click on it and choose to open it in
Notepad or your preferred text editor.
In the command prompt, copy the rpcuser and rpcpassword lines.
Paste them into the text editor and then save and close the file.
By default, you shouldn’t need to change the file permissions.
Return to the command prompt and press the Up arrow key to get the
previous command (ending in bitcoind -daemon) and run it again.
Bitcoin Core daemon should start and print a message that Bitcoin Core is starting.
To interact with Bitcoin Core daemon, you will use the command
bitcoin-cli (Bitcoin command line interface). If you installed Bitcoin
Core into the default location, type the following at the command
prompt to see whether it works:
C:\Program Files\Bitcoin\daemon\bitcoin-cli getblockchaininfo
Note: it may take up to several minutes for Bitcoin Core to start,
during which it will display the following message whenever you use
bitcoin-cli:
error: {"code":-28,"message":"Verifying blocks..."}
After it starts, you may find the following commands useful for basic
interaction with your node:
getblockchaininfo,
getnetworkinfo,
getnettotals,
getwalletinfo,
stop, and help.
For example, to safely stop your node, run the following command:
C:\Program Files\Bitcoin\daemon\bitcoin-cli stop
A complete list of commands is available in the developer reference.
When Bitcoin Core daemon first starts, it will begin to download the
block chain. This step will take at least several hours, and it may
take a day or more on a slow Internet connection or with a slow
computer. During the download, Bitcoin Core will use a significant part
of your connection bandwidth. You can stop Bitcoin Core at any time using
the stop command; it will resume from the point where it stopped the next
time you start it.
Optional: Start Your Node At Boot
Starting your node automatically each time your computer boots makes it easy for you to contribute to the network. The easiest way to do this is to start Bitcoin Core daemon when you login to your computer.
Start File Explorer and go to,
C:\ProgramData\Microsoft\Windows\Start Menu\Programs\StartUp
Right-click on the File Explorer window and choose New → Text file.
Name the file start_bitcoind.bat. Then right-click on it and choose
Open in Notepad (or whatever editor you prefer). Copy and paste the
following line into the file.
C:\Program Files\Bitcoin\daemon\bitcoind -daemon
(If you installed Bitcoin Core in a non-default directory, use that directory path instead.)
Save the file. The next time you login to your computer, Bitcoin Core daemon will be automatically started.
Warning: to prevent data corruption, do not force shutdown your computer from the Windows shutdown screen when you have Bitcoin Core running.
You have now completed installing Bitcoin Core. If you have any questions, please ask in one of Bitcoin’s many communities, such as Bitcoin Forum, Bitcoin StackExchange or the #bitcoin IRC chatroom on Freenode.
To support the Bitcoin network, you also need to allow incoming connections. Please read the Network Configuration section for details.
Windows 7
Instructions for Bitcoin Core 0.10.0.
Go to the Bitcoin Core download page and verify you have made a secure connection to the server.
Click the large blue Download Bitcoin Core button to download the Bitcoin Core installer to your desktop.
Optional: Verify the release signatures
If you know how to use PGP, you should also click the Verify Release Signatures link on the download page to download a signed list of SHA256 file hashes. The file is currently signed by Wladimir J. van der Laan’s key. His primary key’s fingerprint is:
71A3 B167 3540 5025 D447 E8F2 7481 0B01 2346 C9A6
Many previous releases were signed by Gavin Andresen’s key. His primary key’s fingerprint is:
2664 6D99 CBAE C9B8 1982 EF60 29D9 EE6B 1FC7 30C1
You should verify these keys belong to their owners using the web of trust or other trustworthy means. Then use PGP to verify the signature on the release signatures file. Finally, use PGP or another utility to compute the SHA256 hash of the archive you downloaded, and ensure the computed hash matches the hash listed in the verified release signatures file.
After downloading the file to your desktop or your Downloads folder
(C:\Users\<YOUR USER NAME>\Downloads), run it by double-clicking
its icon. Windows will ask you to confirm that you want to run it:
The Bitcoin installer will start. It’s a typical Windows installer, and it will guide you through the decisions you need to make about where to install Bitcoin Core.
To continue, choose one of the following options
-
If you want to use the Bitcoin Core Graphical User Interface (GUI), proceed to the Bitcoin Core GUI section below.
-
If you want to use the Bitcoin Core daemon (bitcoind), which is useful for programmers and advanced users, proceed to the Bitcoin Core Daemon section below.
-
To want to use both the GUI and the daemon, read both the GUI instructions and the daemon instructions. Note that you can’t run both the GUI and the daemon at the same time using the same configuration directory.
Bitcoin Core GUI
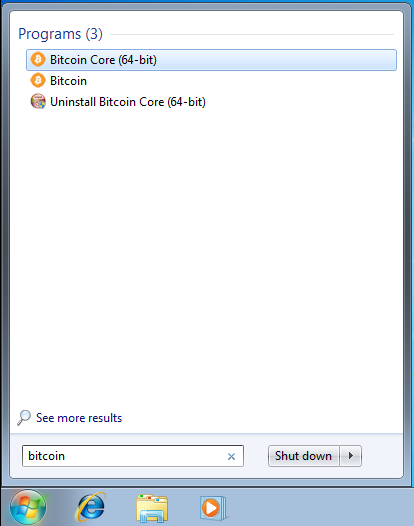
Open the Start menu, type bitcoin into the search box, and click the
Bitcoin Core icon.
You will be prompted to choose a directory to store the Bitcoin block chain and your wallet. Unless you have a separate partition or drive you want to use, click Ok to use the default.
Your firewall may block Bitcoin Core from making outbound connections. It’s safe to allow Bitcoin Core to use all networks. (Note: you will still need to configure inbound connections as described later in the Network Configuration section.)
Bitcoin Core GUI will begin to download the block chain. This step will take at least several hours, and it may take a day or more on a slow Internet connection or with a slow computer. During the download, Bitcoin Core will use a significant part of your connection bandwidth. You can stop Bitcoin Core at any time by closing it; it will resume from the point where it stopped the next time you start it.
After download is complete, you may use Bitcoin Core as your wallet or you can just let it run to help support the Bitcoin network.
Optional: Start Your Node At Login
Starting your node automatically each time you login to your computer makes it easy for you to contribute to the network. The easiest way to do this is to tell Bitcoin Core GUI to start at login.
While running Bitcoin Core GUI, open the Settings menu and choose Options. On the Main tab, click Start Bitcoin on system login. Click the Ok button to save the new settings.
The next time you login to your desktop, Bitcoin Core GUI will be automatically started minimized in the task bar.
Warning: to prevent data corruption, do not force shutdown your computer from the Windows shutdown screen when you have Bitcoin Core running.
You have now completed installing Bitcoin Core. If you have any questions, please ask in one of Bitcoin’s many communities, such as Bitcoin Forum, Bitcoin StackExchange or the #bitcoin IRC chatroom on Freenode.
To support the Bitcoin network, you also need to allow incoming connections. Please read the Network Configuration section for details.
Bitcoin Core Daemon
If you can provide instructions and screenshots for running the latest version of Bitcoin Core daemon on Windows 7, please open an issue and we’ll tell you what we need. The instructions for Windows 8.x may already provide all the necessary information.
Mac OS X Instructions
If you can provide instructions and screenshots for running the latest version of Bitcoin Core on Mac OS X, please open an issue and we’ll tell you what we need.
Network Configuration
If you want to support the Bitcoin network, you must allow inbound connections.
When Bitcoin Core starts, it establishes 8 outbound connections to other full nodes so it can download the latest blocks and transactions. If you just want to use your full node as a wallet, you don’t need more than these 8 connections—but if you want to support lightweight clients and other full nodes on the network, you must allow inbound connections.
Servers connected directly to the Internet usually don’t require any special configuration. You can use the testing instructions below to confirm your server-based node accepts inbound connections.
Home connections are usually filtered by a router or modem. Bitcoin Core will request your router automatically configure itself to allow inbound connections to Bitcoin’s port, port 8333. Unfortunately many routers don’t allow automatic configuration, so you must manually configure your router. You may also need to configure your firewall to allow inbound connections to port 8333. Please see the following subsections for details.
Testing Connections
The BitNodes project provides an online tool to let you test whether your node accepts inbound connections. To use it, start Bitcoin Core (either the GUI or the daemon), wait 10 minutes, and then visit the GetAddr page. The tool will attempt to guess your IP address—if the address is wrong (or blank), you will need to enter your address manually.
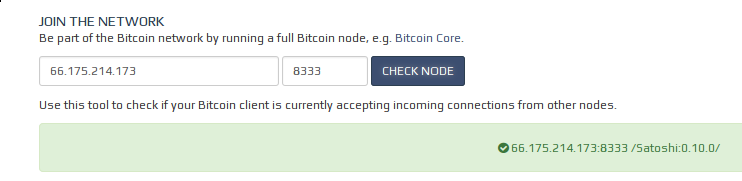
After you press Check Node, the tool will inform you whether your port is open (green box) or not open (red box). If you get the green box, you don’t need to do anything—you accept inbound connections. If you get the red box, please read the enabling connections subsection.
For confirmation that you accept inbound connections, you can use Bitcoin Core. Bitcoin Core can’t tell you directly whether you allow inbound connections, but it can tell you whether or not you currently have any inbound connections. If your node has been online for at least 30 minutes, it should normally have inbound connections. If want to check your peer info using Bitcoin Core, choose the appropriate instructions below:
GUI Peer Info
In the bottom right corner of the Bitcoin Core GUI are several icons. If you hover over the signal strength icon, it will tell you how many connections you have. The icon won’t turn green until you have more than 8 active connections, which only happens if inbound connections are allowed.

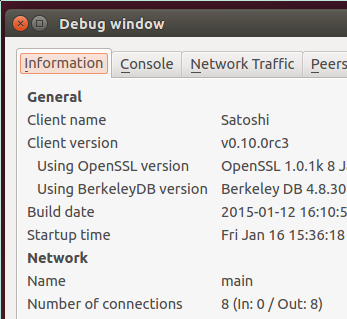
For confirmation, you can go to the Help menu, choose Debug Window, and open the Information tab. In the Network section, it will tell you exactly how many inbound connections you have. If the number is greater than zero, then inbound connections are allowed.
If you don’t have inbound connections, please read the instructions for enabling inbound connections.
Daemon Peer Info
The getconnectioncount
command will tell you how many connections you have. If you have more
than 8 connections, inbound connections are allowed. For example:
$ bitcoin-cli getconnectioncount
52
For confirmation, you can use the
getpeerinfo command to get
information about all of your peers. Each peer’s details will include
an inbound field set to true if the connection is inbound. If you
have any inbound connections, then inbound connections are allowed.
If you don’t have inbound connections, please read instructions for enabling inbound connections.
Enabling Connections
If Bitcoin Core can’t automatically configure your router to open port 8333, you will need to manually configure your router. We’ve tried to make the following instructions generic enough to cover most router models; if you need specific help with your router, please ask for help on a tech support site such as SuperUser.
Enabling inbound connections requires two steps, plus an extra third step for firewall users:
-
Giving your computer a static (unchanging) internal IP address by configuring the Dynamic Host Configuration Protocol (DHCP) on your router.
-
Forwarding inbound connections from the Internet through your router to your computer where Bitcoin Core can process them.
-
Configuring your firewall to allow inbound connections. This step mainly applies to Windows users, as Mac OS X and most Linuxes do not enable a firewall by default.
Configuring DHCP
In order for your router to direct incoming port 8333 connections to your computer, it needs to know your computer’s internal IP address. However, routers usually give computers dynamic IP addresses that change frequently, so we need to ensure your router always gives your computer the same internal IP address.
Start by logging into your router’s administration interface. Most routers can be configured using one of the following URLs, so keep clicking links until you find one that works. If none work, consult your router’s manual.
- http://192.168.0.1 (some Linksys/Cisco models)
- http://192.168.1.1 (some D-Link/Netgear models)
- http://192.168.2.1 (some Belkin/SMC models)
- http://192.168.123.254 (some US Robotics models)
- http://10.0.1.1 (some Apple models)
Upon connecting, you will probably be prompted for a username and password. If you configured a password, enter it now. If not, the Router Passwords site provides a database of known default username and password pairs.
After logging in, you want to search your router’s menus for options related to DHCP, the Dynamic Host Configuration Protocol. These options may also be called Address Reservation. For example, the router page shown below calls the option we need “DHCP Reservation”:

In the reservation configuration, some routers will display a list of computers and devices currently connected to your network, and then let you select a device to make its current IP address permanent:
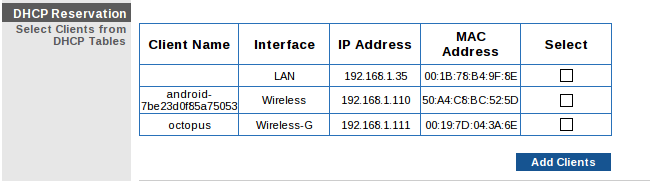
If that’s the case, find the computer running Bitcoin Core in the list, select it, and add it to the list of reserved addresses. Make a note of its current IP address—we’ll use the address in the next section.
Other routers require a more manual configuration. For these routers, you will need to look up the fixed address (MAC address) for your computer’s network card and add it to the list. This operation differs by operating system:
-
Windows 7 & 8: Press Win-R (Windows key plus the R key) to open the Run dialog. Type
cmdto open the console. Typeipconfig /alland find the result that best matches your connection—usually a wireless connection. Look for a line that starts with “Physical Address” and contains a value like this:Physical Address. . . . . . . . . : 01-23-45-67-89-ABReplace all the dashes with colons, so the address looks like this: 01:23:45:67:89:AB. Use that address in the instructions below.
-
Linux: open a terminal and type
ifconfig. Find the result that best matches your connection—a result starting withwlanindicates a wireless connection. Find the field that starts withHWaddrand copy the immediately following field that looks like 01:23:45:67:89:ab. Use that value in the instructions below. -
Mac OS X: open a terminal and type
ifconfig. Find the result that best matches your connection—a result starting withen1usually indicates a wireless connection. Find the field that starts withether:and copy the immediately following field that looks like 01:23:45:67:89:ab. Use that value in the instructions below.
Once you have the MAC address, you can fill it into to your router’s manual DHCP assignment table, as illustrated below. Also choose an IP address and make a note of it for the instructions in the next subsection. After entering this information, click the Add or Save button.

Then reboot your computer to ensure it gets assigned the address you selected and proceed to the Port Forwarding instructions below.
Port Forwarding
For this step, you need to know the local IP address of the computer running Bitcoin Core. You should have this information from configuring the DHCP assignment table in the subsection above.
Login to your router using the same steps described near the top of the DHCP subsection. Look for an option called Port Forwarding, Port Assignment, or anything with “Port” in its name. On the some routers, this option is buried in an Applications & Gaming menu.
The port forwarding settings should allow you to map an external port on your router to the “internal port” of a device on your network as shown in the screenshot below.
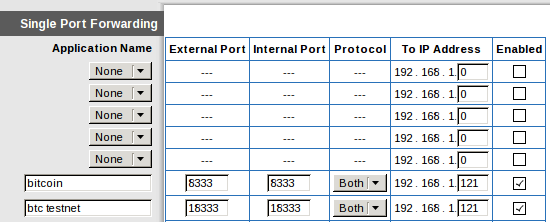
Both the external port and the internal port should be 8333 for Bitcoin. (You may also want to map port 18333 for Bitcoin’s testnet, although this guide does not cover using testnet.) Make sure the IP address you enter is the same one you configured in the previous subsection.
After filling in the details for the mapping, save the entry. You should not need to restart anything. Start Bitcoin Core (if you haven’t already) and follow the Testing Connections instructions to test your connection.
If you still can’t connect and you use a firewall, you probably need to change your firewall settings. See the Firewall section below.
If something else went wrong, it’s probably a problem with your router configuration. Re-read the instructions above to see if you missed anything, search the web for help with “port forwarding”, and ask for help on sites like SuperUser.
We can’t provide direct support, but if you see a way to improve these instructions, please open an issue.
Firewall Configuration
Firewalls block inbound connections. To use Bitcoin, you need to configure your computer’s firewall to allow connections to port 8333. This is usually as easy as starting your firewall configuration software and defining a new rule to allow inbound connections to port 8333. For additional information for Windows, see the links below:
- Instructions for Windows Firewall
- Instructions for Norton Firewall
- Instructions for Mcafee Personal Firewall
Mac OS X comes with its firewall disabled by default, but if you have enabled it, see the section Allowing Specific Applications from the official Apple guide.
Ubuntu also comes with its firewall disabled by default, but if you have enabled it, see the Ubuntu wiki page for information about adding port forwarding rules.
Once you have allowed inbound connections to port 8333, start Bitcoin Core (if you haven’t already) and follow the Testing Connections instructions to test your connection.
If something else went wrong re-read the DHCP, port forwarding, and firewall instructions above to see if you missed anything, search the web for help with “port forwarding” and “opening firewall ports”, and ask for help on sites like SuperUser.
We can’t provide direct support, but if you see a way to improve these instructions, please open an issue.